Installation: SECURE and Sensors
SECURE should be fixed at a location such that:
- It is able to connect to your home wi-fi router, and
- It is able to connect with all the wireless sensors in your home.
- Fix the sensors at their designated locations with double-sided tape.
- Keep the SECURE such that it is able to receive transmissions from all the sensors.
- Once you arrive at a suitable location for SECURE, you may fix SECURE on the wall according to the installation manual.
- Remove the double-sided tape on the sensors and fix them securely using the manufacturer-provided installation kits.
The door intrusion sensors come in 2 parts -- magnet (to be installed on the door) and sensor (to be aligned with the magnet and installed on the door frame). These should be installed vertically in a position as high as possible. Follow the instructions given in the installation manual given along with the sensor.
Follow the following guidelines for the positioning of the PIR sensor.
- The PIR should be ideally located on the wall at a height between 1.95 metres (6-1/2 feet) and 3 metres (10 feet). At this location, it should have the desired coverage.
- At this location,SECURE should be capable of receiving wireless transmission from the PIR.
- Do not position the PIR sensor pointing at a staircase which pets have access to. Also, do not keep any furniture of height 1 metre or above, closer than 1.8 metres (6 feet) from the PIR that a pet climb.
- Do not direct the PIR sensor at any shiny object that may reflect light and cause it to fall on the sensor. This may result in false alarms.
- Do not fix the sensor at a location that would have high air flow, such as a high-speed fan or air conditioner.
- Do not obstruct the coverage of the PIR with large cabinets or large plants.
- Do not fix the PIR near sources of moisture.
LPG is chemically heavier than Air. It tends to accumulate at the floor level near the point of leak. The Gas Leak Detector should be installed at an ideal height of 490mm from the Finished Floor Level (FFL). If this location is not a feasible it can be kept in an location which would contain most of the LPG gas leaked.
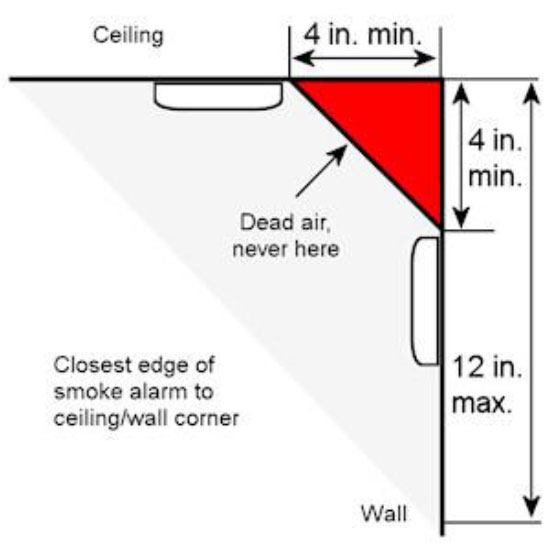
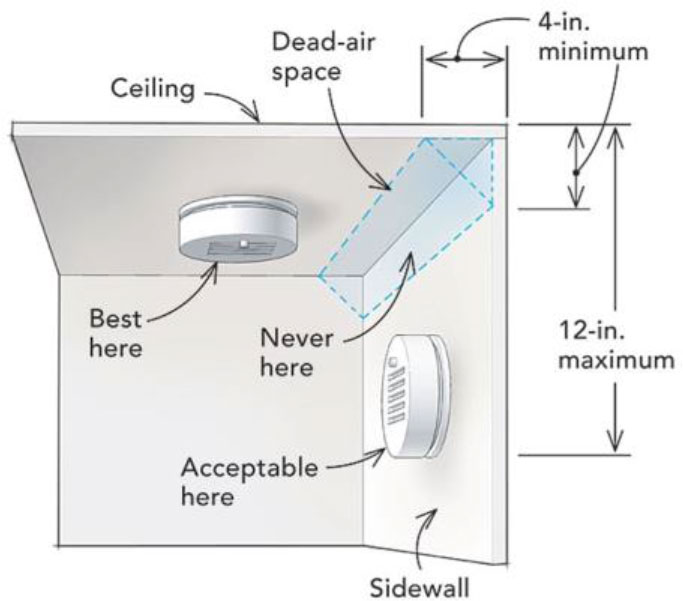
The ideal location for a heat sensor is shown in the diagrams below. (Courtesy: The internet)
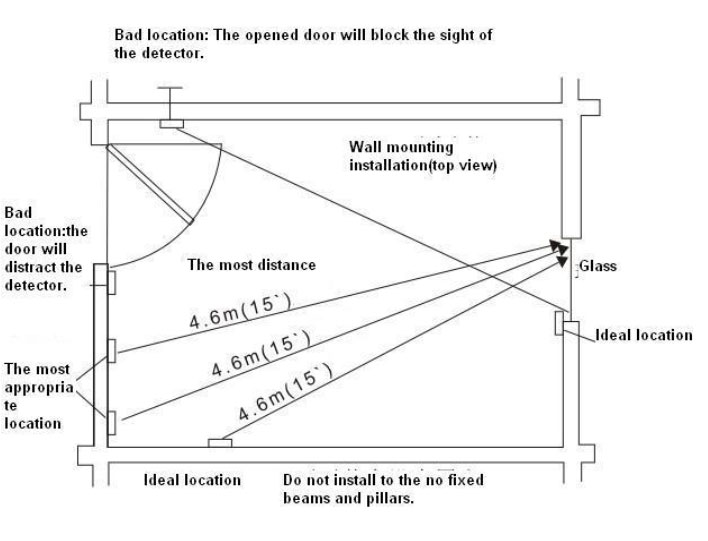
The ideal location for a glass break detector is shown in the diagrams below. (Courtesy: The internet)

At this point in time, SECURE is not compatible with other security systems. So it is not possible to make your security system work with SECURE.
At this point in time, SECURE is not compatible with 3rd party sensors bought from the market.
Connection: (SECURE with the Router)
You will find the MAC ID printed at the back of the SECURE box and on the package. The password is the MAC ID of your SECURE, entered in lowercase.
Example: At the back of the box, you find the MAC ID printed as: A3:B6:B8:C7:FA:5E. When you enter this as the password, type it in as a3:b6:b8:c7:fa:5e.
Example: At the back of the box, you find the MAC ID printed as: A3:B6:B8:C7:FA:5E. When you enter this as the password, type it in as a3:b6:b8:c7:fa:5e.
In Android phones: you can get the security type of your router by touching on “Wi-Fi” under “Settings”, and then touching on the router you are connected to.
Once SECURE connects successfully to the router, it will give out 2 beeps.
SECURE does not detect hidden SSIDs. Please unhide the SSID of your router before attempting to configure SECURE.
Configuration:
You need to have a valid Gmail id in order to use the SECURE app.
You would be directly logging into Google. The SECURE app does not access your Google password in any way.
Yes, you have to enter “:” with MAC Id. MAC ID can be entered in lowercase, uppercase and combination of lowercase and uppercase.
The mobile number you need to enter is the number on which you would receive SMS alerts. At this point in time, the feature of SMS alerts is disabled.
Sensors:
The process to pair the PIR sensor is as follows:
- Insert the battery in the sensor.
- Touch the slider menu and then touch on “Sensor Setup”. Under movement sensors touch the “ Add” button.
- Then touch the “Start” button. At this point the “Start” will be replaced by a circular wheel.
- Move your hand in front of the sensor.
- Once SECURE detects this movement, the circular wheel will be replaced by the “Confirm” button.
- Enter a name for the sensor with a maximum of 12 alphanumeric character, and touch the “Ok” button.
- Touch the “Done“ button to complete the process of sensor pairing.
The process to pair the heat sensor is as follows:
- Insert the battery in the sensor.
- Touch the slider menu and then touch on “Sensor Setup”. Under “Fire sensors” touch the “ Add” button.
- Then touch the “Start” button. At this point the “Start” will be replaced by a circular wheel.
- Trigger the sensor twice, by pressing the “Test” button on the sensor.
- Once SECURE detects the test signal, the circular wheel will be replaced by the “Confirm” button.
- Enter a name for the sensor with a maximum of 12 alphanumeric character, and touch the “Ok” button.
- Touch the “Done“ button to complete the process of sensor pairing.
The process to pair the Gas leak detector is as follows :
- Plug in the Gas leak detector to the 230V power, and wait for the red and yellow light to blink.
- Touch the slider menu and then touch on “Sensor Setup”. Under “Gas sensors” touch the “ Add” button.
- Then touch the “Start” button. At this point the “Start” will be replaced by a circular wheel.
- Use a test gas canister to trigger the sensor. You may also use a gas cigarette lighter by turning off the flame and bringing it close to the sensor.
- Repeat this step once.
- Once the sensor detects the gas, the circular wheel will be replaced by the “Confirm” button.
- Enter a name for the sensor with a maximum of 12 alphanumeric character, and touch the “Ok” button.
- Touch the “Done“ button to complete the process of sensor pairing.
The process to the pair the Glass break sensor is as follows :
- Insert the battery in the sensor.
- Touch the slider menu and then touch on “Sensor Setup”. Under “Glass sensors” touch the “ Add” button.
- Then touch the “Start” button. At this point the “Start” will be replaced by a circular wheel.
- Gently tap the glass break detector twice on a hard surface. Alternately, trigger the sensor twice using an acoustic glass break simulator. You can see the LED lighting up in the sensor each time it is triggered.
- Once SECURE detects the sensor, the circular wheel will be replaced by the “Confirm” button.
- Enter a name for the sensor with a maximum of 12 alphanumeric character, and touch the “Ok” button.
- Touch the “Done“ button to complete the process of sensor pairing.
The process to the Keyfob is as follows :
- Touch the slider menu and then touch on “Sensor Setup”. Under “Keyfob” touch the “ Add” button.
- Then touch the “Start” button. At this point the “Start” will be replaced by a circular wheel.
- Press the “Arm” and “Disarm” buttons on the keyfob.
- Once SECURE detects the test signals, the circular wheel will be replaced by the “Confirm” button.
- Enter a name for the sensor with a maximum of 12 alphanumeric character, and touch the “Ok” button.
- Touch the “Done“ button to complete the process of sensor pairing.
12 alphanumeric characters
Camera:
The list of camera makes and models supported by SECURE are available at: www.silvansecure.co.in/cameras.
You need to enter the URL of the camera at which the motion JPEG (MJPEG) images are available. You should be able to get this information in the manufacturer’s user guide. Now, enter this URL prefixed with the Dynamic DNS address of your home router. Details are provided in the installation manual.
At this point you would not be able to view the feed from the DVR.
Users:
You can have one admin user and 5 child users for a home.
Any of the users (admin or child) can access SECURE only if they have a valid Gmail id. So you would not be able to add this user.
At this point in time, each Gmail id can be associated with only one SECURE. Hence, to add more than one home, you need to have a separate Gmail id per home.
Profiles:
You may create up to 4 profiles, apart from the standard profiles “ARM” and “DISARM”. With this, all the profiles will be displayed on the profile pull down without scrolling.
It is not possible to change the settings of ARM and DISARM.
Safety sensors (Fire/heat sensors and gas leak detectors) are active in all profiles. You can hence not remove or disable them in any profile.
Dashboard:
This is a soft panic button. If any user (admin or user) triggers a soft panic, all the other users will get a notification/message with the name of the person who has triggered the panic. The icon of the soft panic button and the alert button will change to active state (i.e the colour of the icon will change to red). A user may then acknowledge the soft panic by pressing the Alert ” button.
Sound Icon:
Sound Icon:
This is camera icon. If a user clicks on this icon he/she will be able to see the video feed from all the linked cameras shown as a matrix on the screen.
Eye Icon:
Eye Icon:
This is Heartbeat icon; it shows the status of the SECURE whether Secure is running on battery power or electricity. If SECURE is not connected with WiFi then the heat beat icon will change to the “disconnected” icon in red color.
Connected Icon:
Connected Icon:
Power:
SECURE consumes an average of 3 Watts of power.
If no sensors are triggered and its internal battery is fully charged, then SECURE will run for about 3-½ hours. If this decreases to about 2 hours, it is time to change the battery.
The battery has far exceeded its useful life. Contact Silvan for a new battery. Please note that you cannot buy a battery from the market and use it in SECURE.
By touching on the heartbeat icon  (connected icon), you would know if SECURE is running on AC or the battery.
(connected icon), you would know if SECURE is running on AC or the battery.
Internet:
SECURE will keep trying to connect to the internet. In the app the dashboard screen will be greyed out.
SECURE will not slow down the Internet speed.
SECURE needs a continuous connection to the Internet, but does not need a high speed. So it should work as expected.
Sounds:
SECURE gives 3 types of sounds:
- When it is configured and connects to the internet, it gives out 2 beeps.
- If any active sensor triggers, or if the profile changes through the keyfob it will give out 5-6 long beeps.
- If the profile change through the keyfob is unsuccessful, SECURE will give out 2 long beeps.
Others:
Yes. You would need a separate Gmail address per home.
At this point SECURE is available only in white.